Views: 105 Author: Site Editor Publish Time: 2025-12-15 Origin: Site


Content Menu
● Basics of Fits in Machined Parts
● Picking Tolerances for CNC Work
● Press vs Clearance Head-to-Head
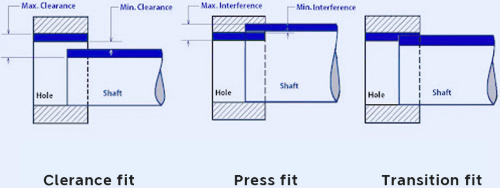
In CNC machining, getting the fit between a shaft and a hole right is critical for how the assembly performs over time. Clearance fits leave a gap so parts can move freely, while press-fits create overlap that holds everything together through friction after forcing the parts in place.
These decisions affect load handling, wear rates, ease of putting things together, and even how much the whole project costs. With modern CNC equipment holding features to microns consistently, tolerances become the key to avoiding loose joints or cracked parts.
Take a typical pump housing: the impeller shaft runs in bushings with clearance to allow oil flow and account for heat buildup. Switch to a gear mounted on a motor shaft—no movement allowed, so a press-fit locks it solidly for torque transfer.
Standards like ISO 286 lay out deviation bands for holes and shafts to hit specific clearance or interference levels reliably. Hole basis systems, with H tolerances on bores, dominate because reaming or boring holes to exact sizes is straightforward in CNC work.
This piece covers practical ways to pick tolerances for both types, looking at materials, finishes, temperatures, and what the machine can actually achieve. Real shop examples show common pitfalls and fixes, drawing from studies on stress in interference joints and capability-linked tolerancing.
Clearance means the hole always ends up larger than the shaft, even at extremes. Codes like H7/g6 give smooth running with minimal gap.
For a 25 mm feature, H7/h6 might yield 0.015 mm minimum clearance up to 0.040 mm max. Parts slide easily, ideal for rotation or sliding.
In linear guides, aluminum rails paired with steel carriages often run H9/d9 for dirt tolerance and thermal growth. Journal bearings in small motors use H8/f7 to maintain oil films without binding.

Here the shaft exceeds the hole size, forcing elastic-plastic deformation. H7/p6 or H7/s6 common for steel parts.
Same 25 mm nominal: H7/p6 interference roughly 0.020 to 0.050 mm. Pressing generates radial pressure holding the joint.
Dowel pins in tooling plates typically H7/k6 transition or full interference for alignment. Wheel hubs on axles rely on heavy press-fits for safety-critical retention.
H7/k6 or H7/n6 allow slight clearance or light interference—hand assembly possible, but close location.
Adjustable arms in fixtures or locators needing occasional removal fit this category.
Materials matter most: steel hubs take more interference than cast iron without yielding. Aluminum expands faster, loosening fits at temperature.
Surface texture reduces effective overlap—turned Ra 3.2 μm deforms more than ground Ra 0.8 μm.
CNC capability: bored holes hit H7 easily, drilled maybe H9. Honing pushes H6 but adds cost.
Operating temps: engine parts see fits loosen; cold environments tighten.
Hole basis wins in practice—standard reamers give H grades cheaply. Shafts vary with letters.
ISO tables simplify lookups for common diameters.
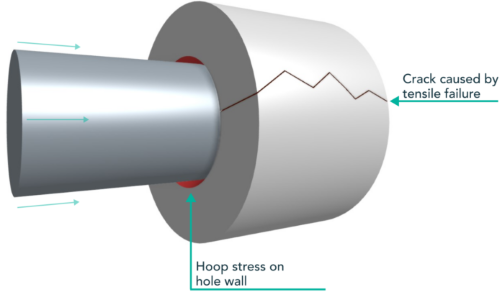
Assembly loads create hoop tension in hubs, compression in shafts. Thick-wall cylinder equations estimate these, but new models account for edge effects and non-contact zones.
Studies using updated thick-wall theory match measured press curves better, especially multilayer stacks.
Knurled versions add form locking: grooves cut during pressing boost torque while controlling stress.

Steel pin into aluminum block: H7/r6 gives 0.04 mm average interference, compensating expansion.
Precision fixture dowels: H7/p6 for zero shift under load.
Bearing outer races: often H7/js6 transition to limit preload.
Lead-in chamfers prevent shaving. Dry lubricants cut peak forces. Shrink fitting—cool shaft, heat hub—assembles tight fits without damage.
Gap size controls film thickness. Too small risks metal contact; too large allows pounding.
Hydraulic pistons run H9/f8 for boundary lubrication. Conveyor idlers go H11/c11 for contamination.
Multiple clearances add up—critical stacks need tighter grades like H7/g6 on locators.
Press-fits shine for static torque: pulleys, cams, structural links—saving bolts, cutting weight.
Clearance for dynamics: spindles, slides—low drag, easy service.
Many designs mix: press hub onto shaft, clearance for bearing.

Check proposed tolerances against Cp/Cpk data. Run pilot assemblies, measure actual overlaps.
Connecting rod studies tie machining capabilities directly to fit specs for better yields.
Monitor tools for drift—probing compensates.
It all comes down to function: rigid no-play joints point to press-fits, motion demands clearance.
Press-fits deliver strong, clean connections but need tight control and assembly care. Clearance offers flexibility and forgiveness, sometimes at rigidity's expense.
Following ISO guidelines, respecting material limits, and matching tolerances to machine realities leads to assemblies that hold up in service. Ongoing work refining models for press curves and capability-based specs keeps pushing reliability higher.
Smart tolerance choices from the start prevent field issues and keep costs down through the product's life.